This is an old revision of the document!
Table of Contents
Netzwerkkonfiguration
Einführung
Standardmäßig startet SliTaz bei der Systemeinleitung einen DHCP-Klienten (udhcpc) für die Ethernet-Schnittstelle. Wenn der Netzwerk-Adapter des Rechners als Ethernet-Schnittstelle erkannt wurde und mit einem Vermittlungsknoten („router“) verbunden ist, sollten Netzwerkverbindungen bereits möglich sein. Bei jeder Systemeinleitung fordert der DHCP-Klient erneut eine IP-Adresse vom DHCP-Server an. Letzterer ist in den Vermittlungsknoten integriert oder befindet sich auf einem anderen Rechner. Bei jeder Anforderung kann eine andere IP-Adresse zugewiesen werden. Wenn der Rechner immer dieselbe, statische IP-Adresse erhalten soll, kann diese direkt in die Konfigurationsdatei geschrieben werden oder über das Menü Systemwerkzeuge → Slitaz Panel und den Reiter Netzwerk eingegeben werden. Mit dem Kommando ifconfig können alle vorhandenen Netzwerk-Adapter angezeigt werden:
$ ifconfig -a
Mit dem Kommando route ohne Parameter kann die Routentabelle ausgegeben werden:
$ route
Die globale Netzwerk-Konfigurationsdatei heißt /etc/network.conf. Diese kann (wie oben beschrieben) vom Administrator grafisch bearbeitet werden oder direkt editiert werden.
Netbox - Netzwerk konfigurieren (SliTaz 4.0)
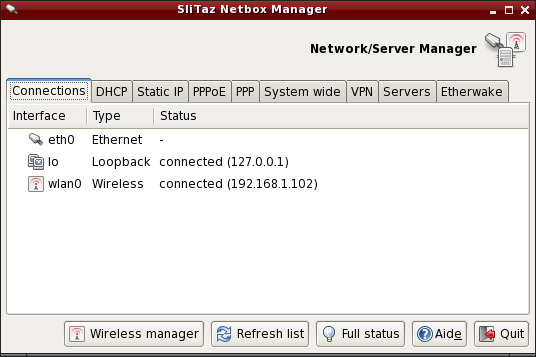
Netbox ist eine kleine GTK+ -Anwendung zur Konfigurierung von Netzwerk-Adaptern mit DCHP oder einer festen (statischen) IP-Addresse. Die Reiter können verwendet werden um die Adapter zu aktivieren oder zu deaktivieren und automatisch die eingegebenen Werte in die Systemdateien zu übernehmen. Netbox hat einen Reiter, über den direkt die globalen Netzwerk-Konfigurationsdateien bearbeitet werden und Reiter zum Konfigurieren von PPP/PPPoE Benutzernamen und Kennwörtern. Desweiteren können Server für SSH, DHCP, PXE, DNS, usw. konfiguriert werden und es kann ein VPN („virtual private network“) mit den entsprechenden Werkzeugen eingerichtet werden.
Netbox kann über das Menü Systemwerkzeuge oder mit dem Kommando
$ subox netbox
gestartet werden.
Wifi-box - Grafisches Konfigurieren des Drahtlosnetzwerks (SliTaz 4.0 and 5.0 „Weekly“)
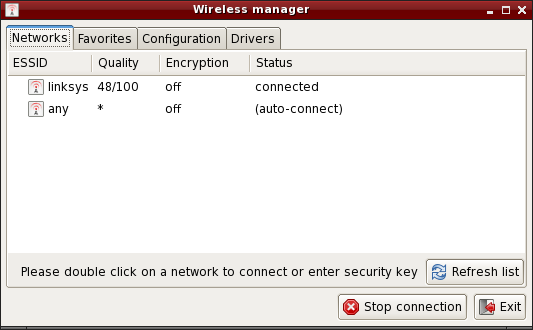
Wifi-box ist eine kleine Anwendung zum Konfigurieren des Drahtlosnetzwerks (Wifi, WLAN, oder „Wireless“). Der Reiter 'Netzwerke' zeigt eine Liste erreichbarer Funknetzwerke. Mit einem Doppelklick auf den Netzwerknamen wird eine Verbindung aufgebaut. Wenn das Netzwerk gesichert ist, wird der Schlüssel gesucht.
Mit dem Reiter 'Favoriten' können bevorzugte Netzwerkverbindungen gespeichert werden. Mit einem Doppelklick auf den Namen einer gespeicherten Netzwerkverbindung wird eine Verbindung aufgebaut. Mit dem Reiter 'Konfiguration' kann eine Netzwerkverbindung manuell konfiguriert werden, wobei auch erweiterte Einstellungen wie Modus oder Kanal eingegeben werden können. Mit dem Reiter 'Treiber' kann der Netzwerk-Adapter konfiguriert werden; dazu gibt es drei Möglichkeiten:
- Der Netzwerk-Adapter wird vom Linux-Kern direkt durch einem Modul unterstützt.
- Der Netzwerk-Adapter benötigt einen Modul und nicht-freie Firmware, die automatisch mit tazhw installiert werden kann.
- Der Netzwerk-Adapter wird von Linux nicht unterstützt und es muss mit tazndis („Windows driver manager“) ein Windows-Treiber installiert werden.
Wifi-box kann mit dem Kommando
# wifi-box
gestartet werden.
/etc/hostname - Der Rechnername
In der Datei /etc/hostname wird der Rechnername festgelegt. Daraus wird bei der Systemeinleitung mit dem Kommando hostname der Rechnername gesetzt. Das Kommando hostname ohne Parameter zeigt den aktuellen Rechnernamen:
$ hostname
Der Rechnername kann geändert werden, indem z.B. mit dem Kommando echo oder mit einem Texteditor ein anderer Name in diese Datei geschrieben wird (das darf nur der Administrator). Im folgenden Beispiel wird mit dem Kommando echo der Rechnername 'kayam' eingetragen:
# echo "kayam" > /etc/hostname
/etc/network.conf
Die Datei /etc/network.conf enthält bei SliTaz die Netzwerk-Konfiguration. Die Syntax ist einfach und die Datei kann mit einem Texteditor (z.B. Nano) bearbeitet werden. Bei der Systemeinleitung greift die Kommandoprozedur /etc/init.d/network.sh auf /etc/network.conf zu, um die Netzwerk-Adapter zu konfigurieren.
Dynamische IP-Adresse - DHCP-Klient udhcpc
Der in Busybox enthaltene DHCP-Klient udhcpc verwendet bei der Systemeinleitung /usr/share/udhcpc/default.script um eine dynamische IP-Addresse zu erhalten. Die Optionen von udhcpc können mit
# udhcpc --help
angezeigt werden.
Um udhcpc für die Ethernet-Schnittstelle zu deaktivieren oder die Ethernet-Schnittstelle zu ändern (z.B. eth1), muss die Datei /etc/network.conf bearbeitet werden. Indem der Wert der Variablen DHCP auf “no” gesetzt wird, wird udhcpc deaktiviert:
# Dynamische IP-Adresse.
# DHCP-Klienten aktivieren (yes) oder deaktivieren (no).
DHCP="no"
Statische IP-Adresse - Eine bestimmte Adresse verwenden
Damit immer eine bestimmte IP-Adresse verwendet wird, muss der Wert der Variablen STATIC auf “yes” gesetzt werden:
# Statische IP-Adresse.
# Statische IP-Adresse aktivieren (yes) oder deaktivieren (no).
STATIC="yes"
Zusätzlich muss natürlich eine IP-Adresse, die Netzmaske, ein Standard-Netzkoppler („default gateway“) und ein DNS-Server angegeben werden. Beispiel:
# statische IP-Adresse und Netzmaske.
IP="192.168.0.6"
NETMASK="255.255.255.0"

# Standard-Netzkoppler.
GATEWAY="192.168.0.1"

# DNS-Server.
DNS_SERVER="192.168.0.1"
Statische Routen
Statische Routen können jederzeit mit dem Kommando route add hinzugefügt werden:
route add -net 192.168.20.0 netmask 255.255.255.0 gw 192.168.21.2
Eine statische Route bleibt bis zur Systembeendigung wirksam. Wenn sie permanent wirksam sein sollen, können route-Kommandos in /etc/init.d/local.sh eingefügt werden.
PPPoE-Verbindung kernel-mode
PPPoE connection in kernel-mode needs 2 files. Die erste Datei ist /etc/ppp/options, worin der Benutzername angegeben werden muss:
plugin rp-pppoe.so
name <benutzername>
noipdefault
defaultroute
mtu 1492
mru 1492
lock
Now you have to configure /etc/ppp/pap-secrets or /etc/ppp/chap-secrets:
# client	       server	       secret			IP addresses
"benutzername"       *               "kennwort"
The config file /etc/resolv.conf will be automatically loaded. Finished, you can now connect to the internet with pppd:
# pppd eth0
On an installed system you can start pppd on each boot using the local startup script: /etc/init.d/local.sh
Ethernet PPPoE ADSL-Modem - PPPoE mit rp-pppoe
In diesem Abschnitt wird beschrieben, wie eine ADSL-Internet-Verbindung über ein Ethernet-PPPoE-Modem in bridge mode konfiguriert werden kann. To set an ASDL protocol via PPPoE, SliTaz provides the utilities package rp-pppoe. Using pppoe-setup is a snap and you can quickly configure the network. If you use DCHP it's even easier, because the server from your ISP will take care of everything. If you do not have DHCP, you must first disable its use via DHCP=“no” in the configuration file /etc/network.conf. It should be noted that to modify configuration files and system logs you must first become root. To install and change the variable DHCP with Nano (ctrl + X to save & exit):
 $ su
 # tazpkg get-install rp-pppoe
 # nano /etc/network.conf
Konfigurieren mit pppoe-setup
To begin to configure your PPPoE connection, you must first open an Xterm or Linux console and launch pppoe-setup and then begin to answer the following questions:
# pppoe-setup
- Benutzernamen eingeben (der Benutzername, den Ihr Netzdienstanbieter Ihnen gegeben hat).
- Internet interface, default is eth0 unless you have more than one, in which case you will have eth1, eth2, etc. Usually the Enter key is sufficient.
- If you have a permanent ASDL link answer yes, otherwise answer no (default).
- Specify the primary and secondary DNS your ISP uses (you may have to ask).
- Kennwort eingeben (das Kennwort, das Ihr Netzdienstanbieter Ihnen gegeben hat), zweimal
- Choose the firewall settings depending on your hardware. If you have a router you can enter 1 or 2. If in doubt enter 1.
Auf- und Abbauen der Verbindung
Still using the command line, simply type pppoe-start to start the connection. A few seconds later the system tells you that it is connected. If it gives you a message like TIMED OUT, you may have poorly configured or the connection is defective. Please check the wiring and repeat the installation from the beginning. To start the connection:
# pppoe-start
To stop the connection, you can type:
# pppoe-stop
To check the connection status:
# pppoe-status
Treiber für eine Netzwerkschnittstelle installieren
In case you need a network card driver and don't know the driver name, you can use the command lspci to find your card and then modprobe to load a module. In Live mode you can use the SliTaz boot option modprobe=modules to automatically load Kernel modules. To get a list of all available network card drivers, display PCI eth cards and load a module:
 # modprobe -l | grep drivers/net
 # lspci | grep [Ee]th
 # modprobe -v module_name
On an installed system you just need to add the module_name to the variable LOAD_MODULES in /etc/rcS.conf to load your module bei jeder Systemeinleitung.
Verwalten des Zugangsschutzsystems (firewall using iptables)
SliTaz provides a very basic firewall, the kernel security rules are launched at boot time and iptables rules are disabled by default. You can activate/disable these at startup by using the configuration file /etc/firewall.conf.
The default firewall script begins with its own set options for the Kernel ie. ICMP redirects, source routing, logs for unresolved addresses and spoof filters. The script then launches the rules defined in the iptables_rules() function of the configuration file: /etc/firewall.conf.
The firewall uses Iptables, it consists of two files: /etc/firewall.conf and /etc/init.d/firewall, you shouldn't need to modify these. Note Iptables has lots of options. For more infomation see the official documentation available online: http://www.netfilter.org/documentation/.
Starten, Beenden und Neustarten des Zugangsschutzsystems
The script /etc/init.d/firewall lets you start/restart, stop or display the status of the firewall. The restart option is often used to test new rules after editing the configuration file. Example:
# /etc/init.d/firewall restart
Zugangsschutzsystems bei der Systemeinleitung aktivieren oder deaktivieren
To enable/disable options specific to the Kernel place “yes” or “no” in the variable KERNEL_SECURITY= :
# Enable/disable kernel security at boot time.
KERNEL_SECURITY="yes"
And to activate/deactivate the iptables rules, it is necessary to modify the IPTABLES_RULES= variable :
# Enable/disable iptables rules.
IPTABLES_RULES="yes"
Iptables-Regeln hinzufügen, ändern oder entfernen
At the bottom of the configuration file: /etc/firewall.conf, you will find a function named: iptables_rules(). This function contains all of the iptables commands to launch when the firewall starts. To delete a rule, It is advisable to comment out the corresponding line with a #. It is not advisable to leave the function completely empty, if you want to disable the iptables rules just add “no” to the variable IPTABLES_RULES= in the configuration file.
Here's an example of using iptables rules. It only allows connections on the localhost and the local network, and ports 80, 22, and 21 used by the web server HTTP, the SSH secure server and FTP respectively. All other incoming and outgoing connections are refused, so it's fairly restrictive.
# Netfilter/iptables rules.
# This shell function is included in /etc/init.d/firewall.sh
# to start iptables rules.
#
iptables_rules()
{

# Drop all connections.
iptables -P INPUT DROP
iptables -P OUTPUT DROP

# Accept all on localhost (127.0.0.1).
iptables -A INPUT -i lo -j ACCEPT
iptables -A OUTPUT -o lo -j ACCEPT

# Accept all on the local network (192.168.0.0/24).
iptables -A INPUT -s 192.168.0.0/24 -j ACCEPT
iptables -A OUTPUT -d 192.168.0.0/24 -j ACCEPT

# Accept port 80 for the HTTP server.
iptables -A INPUT -i $INTERFACE -p tcp --sport 80 -j ACCEPT
iptables -A OUTPUT -o $INTERFACE -p tcp --dport 80 -j ACCEPT

# Accept port 22 for SSH.
iptables -A INPUT -i $INTERFACE -p tcp --dport 22 -j ACCEPT
iptables -A OUTPUT -o $INTERFACE -tcp --sport 22 -j ACCEPT

# Accept port 21 for active FTP connections.
iptables -A INPUT -i $INTERFACE -p tcp --dport 21 -j ACCEPT
iptables -A OUTPUT -i $INTERFACE -p tcp --sport 21 -j ACCEPT

}


