Table of Contents
HOWTO do a SliTaz LiveUSB for EFI computers
Here starts my trilogy about UEFI & SliTaz ![]()
This first tutorial describes how to do an EFI LiveUSB of SliTaz Next from a SliTaz Rolling session.
It doesn't matter that the operating system is 32bit or if your EFI computer is 64bit. The only imperative is a 64bit computer needs a 64bit EFI boot loader to start.
1. Preparing the USB stick
Insert a USB stick; if your file manager is set to mount removable media automatically when they are inserted, unmount the stick but don't eject it.
Open a terminal as the root user and change in /root:
tux@slitaz:~$ su
Password:
root@slitaz:/home/tux# cd /root
root@slitaz:~#
Identify the stick:
# fdisk -l
If not, replace all sdb1 occurrences with your device identification, ie: sdc1.
dosfstools and mtools must be installed on your system):
# mkfs.vfat /dev/sdb1
All the data on the partition sdb1 will be destroyed.
Set the flags boot and lba to your stick:
# parted /dev/sdb set 1 boot on
# parted /dev/sdb set 1 lba on
Don't pay attention to the messages Information: You may need to update /etc/fstab.
2. Creating the LiveUSB
Download the SliTaz Next ISO.
# wget http://mirror1.slitaz.org/iso/next/slitaz-next-170930.iso
Here are two possibilities: use tazusb or copy the files manually.
- Using tazusb
In the terminal, type:
# tazusb gen-iso2usb slitaz-next-170930.iso /dev/sdb1
When tazusb has finished the job, exit and mount the stick:
# exit
# mount /dev/sdb1 /mnt
Go to step 3
- Copying files manually
Mount the stick:
# exit
# mount /dev/sdb1 /mnt
Mount the ISO file:
# mount -o loop slitaz-next-170930.iso /media/cdrom
Copy the files to the stick:
# cp -r /media/cdrom/boot /mnt
Unmount the ISO:
# umount /media/cdrom
3. Installing an EFI boot loader
Create a /efi/boot directory on your stick:
# mkdir -p /mnt/efi/boot
We are going to install GRUB 2 but it exists on other boot loaders compatible with EFI.
3.1 32bit EFI systems
Install the grub2-efi package:
# tazpkg -gi grub2-efi
Copy the boot loader in the /efi/boot directory you previously created on your stick:
# cp /boot/efi/boot/bootia32.efi /mnt/efi/boot/bootia32.efi
3.2 64bit EFI systems
Download the bootx64.efi file from the Next64 project.
wget http://cook.slitaz.org/next64/grub2/browse/taz/grub2-efi-2.02/fs/boot/efi/boot/bootx64.efi
Copy the boot loader in the /efi/boot directory you previously created on your stick:
# cp bootx64.efi /mnt/efi/boot/bootx64.efi
4. Configuration file for GRUB 2
Create a /boot/grub directory on your stick:
# mkdir -p /mnt/boot/grub
With your preferred text editor (ie nano), create a configuration file for GRUB 2:
# nano /mnt/boot/grub/grub.cfg
Example:
### CONFIGURATION FILE FOR GRUB 2 ###
#

# Comment the line if you want SliTaz to start automatically at boot or
# change the value to define the time (seconds) to wait before booting.
set TIMEOUT=-1

# Menu 0: boot SliTaz Next
menuentry "SliTaz Next (ISO 20170930 - kernel 4.9.30)" {
   set root=(hd0,1)
   linux /boot/bzImage ro root=/dev/null video=-32 autologin
   initrd /boot/rootfs.gz
}
linux /boot/bzImage ro root=/dev/null video=-32 kmap=fr-latin1 autologin
# umount /mnt
Your Live is ready. But maybe the hardest remains to do.
5. Configuring the computer
Computers that came with Windows 8 / Windows 10 preinstalled start in Boot mode= UEFI and have the Secure boot= Enabled.
The Secure boot prevents the loading of drivers or OS loaders that are not signed with a digital signature ($old by Microsoft).
With SliTaz not having any digital signatures, you have to disable the secure boot.
The following lines describe how to do it on a hp Laptop 17-bs032 but it can be different for you; there are almost as many ways as there are manufacturers… ![]()
Even access to the Setup is different from one computer to another. If you don't know how to access the setup, have a look here (sorry for french; I couldn't find an equivalent link in english).
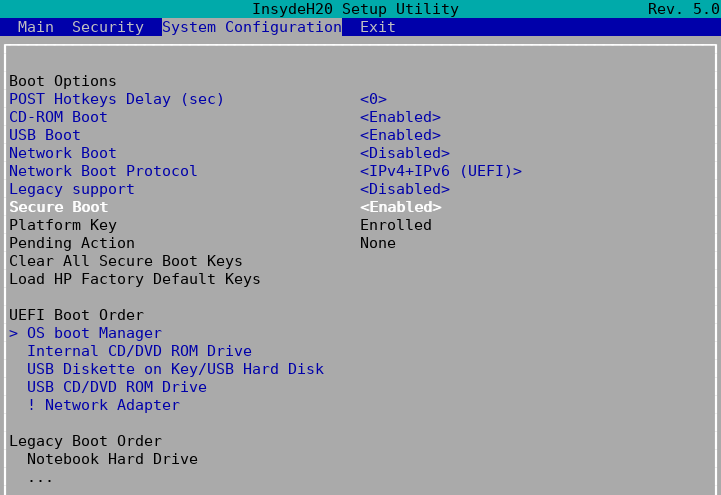
On the hp Laptop 17-bs032, press the [F10] key immediately after you've powered on the computer until the BIOS Setup Main page is displayed. Use the right arrow to display the System Configuration page.

Select >Boot Options

If you're not sure or don't remember what you've done/changed, Exit Setup without saving!
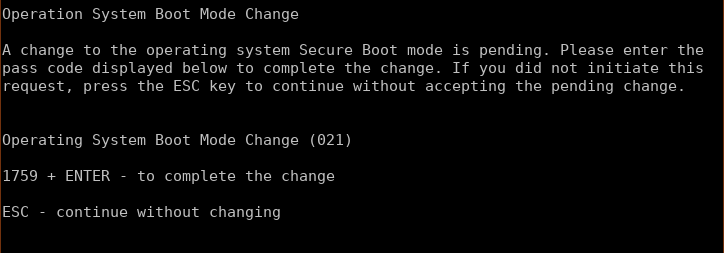
Secure Boot and set it to Disabled.
Then, in UEFI Boot Order, place USB Diskette on Key/USB Hard Disk at the top of the list.

Well, it wasn't so hard. But we'll see when proceeding at the full installation on an acer Aspire v3-111p that it is quite different.
6. Run your Live
When Linux finds an hiberfil.sys file , it refuses to mount the partition. If you still try to access to the partition and worst if you wrote on it, you can corrupt the file system and Windows won't start anymore. You must disable the Fast Startup if you want to access your hard disk! But this HOWTO is already long enough; we will see this in the second part of UEFI and SliTaz.
Insert your Live in a USB port and restart the computer.
If you didn't modify the UEFI Boot Order, access the Multiboot menu.
If you don't know how to access the Multiboot menu, have a look here).
Copy bootia32.efi and bootx64.efi in the /efi/boot directory of the Live!
Cherry on the cake!
Plug your Live in a non EFI computer and… yes it boots too! Well, at least on a Fujitsu E Series…
And on very old 32bit computers - like Pentium 4 - if you've used tazusb, your Live will boot with Syslinux and though the stick is FAT32, it will be mounted at boot and /home/tux will be created giving you persistence :).
Want to enjoy the memory beyond 4GB?
Create a LiveUSB with Rolling core64.
I never succeeded to boot it in graphics mode on the two UEFI computers I tested probably because some drivers are missing in Rolling. But alanyih did it:).
You are now ready for a frugal install. Click here!
| 2018/05/10 | Added: 32bit EFI systems and tazusb method; minor modifications |
| 2018/04/06 | Creation |
| Date | Modification |
|---|

