Table of Contents
Network Configuration
About the Network
By default SliTaz starts a DHCP client (udhcpc) on eth0 at boot time. If your network card has been identified as an eth0 interface and you use a router, your connection should already be working. DHCP is dynamically configured, on each boot the client asks for a new IP address from the DHCP server which is integrated into the router, or on another computer. If you need a static IP, you can directly edit config files or use the Network tab at System Tools → Slitaz Panel. In a terminal or a Linux console, you can list all available network interfaces with the command ifconfig followed by the -a option:
$ ifconfig -a
To display the Kernel's IP routing table, you can use the route command without any arguments:
$ route
The system wide network configuration file is /etc/network.conf. It can be graphically configured at the Network tab on SliTaz Panel or directly edited by the root administrator.
Netbox - Configure the network (SliTaz 3.0 and older)
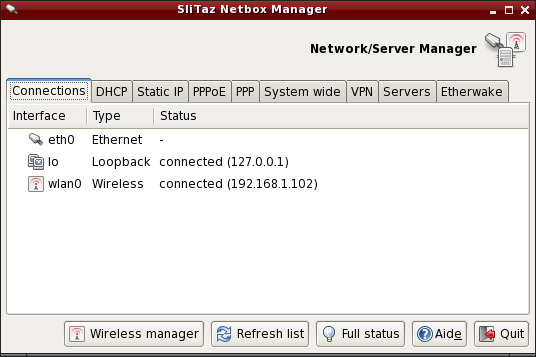
Netbox is a small GTK+ application to configure a network interface using DCHP or a fixed (static) IP address. The tabs can be used to start/stop the connections and automatically change the values in the system files. Netbox provides a system wide tab from which you can directly edit network configuration files, and tabs to configure PPP/PPPoE username/passwords. Servers such as SSH, DHCP, PXE, DNS, etc can also be configured and it's possible to create your own virtual private network (VPN) using the tools provided.
You can start netbox from the System tools menu or via a terminal:
$ subox netbox
wifi-box was renamed to wifibox
SliTaz Panel/Network/Wireless offers same configuration
SliTaz-5.0 offers slitaz-configs wifi configuration using ncurses interface.
Wifi-box - Graphical configuration of the wireless network (SliTaz 4.0 and 5.0 Weekly)
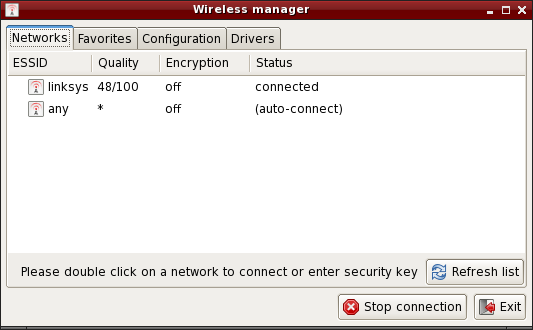
Wifi-box is small interface to configure a network connection (Wifi, WLAN, or Wireless). The 'Networks' tab displays a list of available networks, just double click on a network name to connect. If the network is secure, the key will then be sought.
The 'Favorites' tab allows you to set your preferred networks. Once a network is added, just double click on the network name to connect. The 'Configuration' tab lets you configure a connection manually using the advanced settings such as the mode or channel. The 'Drivers' tab allows you to configure a network card; there are 3 options:
- The card is supported directly by the kernel via a module.
- The card needs a module and non-free firmware that can be installed automatically via the auto-detect tool (tazhw).
- The card is not supported by Linux and a Windows driver must be installed via the Windows driver manager (tazndis).
You can start wifi-box via a terminal:
# wifi-box
/etc/hostname - The hostname
The file /etc/hostname sets the machine name. This is loaded at system startup with the command 'hostname', without an argument this command returns the current machine name:
$ hostname
To change the hostname, you can use the echo command or a text editor available on SliTaz (you must be root). Example using echo and the machine name kayam:
# echo "kayam" > /etc/hostname
/etc/network.conf
/etc/network.conf is the SliTaz system network configuration file. It's syntax is simple and you can edit its contents with a text editor such as Nano. /etc/network.conf is used by the script /etc/init.d/network.sh to configure the network interface at boot time.
Dynamic IP - DHCP client udhcpc
The DHCP client udhcpc supplied with Busybox uses the /usr/share/udhcpc/default.script to get an IP address dynamically at boot. It supports various options which you can view with the --help option:
# udhcpc --help
To disable udhcpc on eth0 or modify the interface (eg eth1), you must edit the /etc/network.conf file and place the value “no” in the variable DHCP=:
# Dynamic IP address.
# Enable/disable DHCP client at boot time.
DHCP="no"
Static IP - Using a specific address
You can specify a fixed IP address to configure at boot time by using the value “yes” in the variable STATIC=:
# Static IP address.
# Enable/disable static IP at boot time.
STATIC="yes"
For the configuration to work, you must specify an IP address, its subnet mask, a default gateway (gateway) and DNS server to use. Example:
# Set IP address, and netmask for a static IP.
IP="192.168.0.6"
NETMASK="255.255.255.0"

# Set route gateway for a static IP.
GATEWAY="192.168.0.1"

# Set DNS server. for a static IP.
DNS_SERVER="192.168.0.1"
Static routes
Static routes can be added at any time via the route add command:
route add -net 192.168.20.0 netmask 255.255.255.0 gw 192.168.21.2
The static route will remain active until the next reboot. In order to make these routes persistent, add them to /etc/init.d/local.sh
PPPoE connection kernel-mode
PPPoE connection in kernel-mode needs 2 files. The first file is /etc/ppp/options where you must specify your login name:
plugin rp-pppoe.so
name <your_login>
noipdefault
defaultroute
mtu 1492
mru 1492
lock
Now you have to configure /etc/ppp/pap-secrets or /etc/ppp/chap-secrets:
# client	       server	       secret			IP addresses
"your_login"       *               "your_password"
The config file /etc/resolv.conf will be automatically loaded. Finished, you can now connect to the internet with pppd:
# pppd eth0
On an installed system you can start pppd on each boot using the local startup script: /etc/init.d/local.sh
Ethernet PPPoE ADSL Modem - PPPoE with rp-pppoe
This section is about setting up an ADSL Internet connection using an ethernet PPPoE modem in bridge mode. To set an ASDL protocol via PPPoE, SliTaz provides the utilities package rp-pppoe. Using pppoe-setup is a snap and you can quickly configure the network. If you use DCHP it's even easier, because the server from your ISP will take care of everything. If you do not have DHCP, you must first disable its use via DHCP=“no” in the configuration file /etc/network.conf. It should be noted that to modify configuration files and system logs you must first become root. To install and change the variable DHCP with Nano (ctrl + X to save & exit):
 $ su
 # tazpkg get-install rp-pppoe
 # nano /etc/network.conf
Configure with pppoe-setup
To begin to configure your PPPoE connection, you must first open an Xterm or Linux console and launch pppoe-setup and then begin to answer the following questions:
# pppoe-setup
- Enter your username, please note that this is the username with which you communicate with your ISP.
- Internet interface, default is eth0 unless you have more than one, in which case you will have eth1, eth2, etc. Usually the Enter key is sufficient.
- If you have a permanent ASDL link answer yes, otherwise answer no (default).
- Specify the primary and secondary DNS your ISP uses (you may have to ask).
- Enter the password with which you communicate with your ISP (you need to enter it twice).
- Choose the firewall settings depending on your hardware. If you have a router you can enter 1 or 2. If in doubt enter 1.
Start and Stop the connection
Still using the command line, simply type pppoe-start to start the connection. A few seconds later the system tells you that it is connected. If it gives you a message like TIMED OUT, you may have poorly configured or the connection is defective. Please check the wiring and repeat the installation from the beginning. To start the connection:
# pppoe-start
To stop the connection, you can type:
# pppoe-stop
To check the connection status:
# pppoe-status
Install network card driver
In case you need a network card driver and don't know the driver name, you can use the command lspci to find your card and then modprobe to load a module. In Live mode you can use the SliTaz boot option modprobe=modules to automatically load Kernel modules. To get a list of all available network card drivers, display PCI eth cards and load a module:
 # modprobe -l | grep drivers/net
 # lspci | grep [Ee]th
 # modprobe -v module_name
On an installed system you just need to add the module_name to the variable LOAD_MODULES in /etc/rcS.conf to load your module on each boot.
iptables rules are moved from /etc/init.d/firewall.sh to /etc/slitaz/firewall.sh
Reference: http://hg.slitaz.org/slitaz-tools/rev/769
Manage the Firewall (firewall) using Iptables
SliTaz provides a very basic firewall, the kernel security rules are launched at boot time and iptables rules are disabled by default. You can activate/disable these at startup by using the configuration file /etc/firewall.conf.
The default firewall script begins with its own set options for the Kernel ie. ICMP redirects, source routing, logs for unresolved addresses and spoof filters. The script then launches the rules defined in the iptables_rules() function of the configuration file: /etc/firewall.conf.
The firewall uses Iptables, it consists of two files: /etc/firewall.conf and /etc/init.d/firewall, you shouldn't need to modify these. Note Iptables has lots of options. For more infomation see the official documentation available online: http://www.netfilter.org/documentation/.
Start, stop, restart the firewall
The script /etc/init.d/firewall lets you start/restart, stop or display the status of the firewall. The restart option is often used to test new rules after editing the configuration file. Example:
# /etc/init.d/firewall restart
Enable/Disable the firewall at boot
To enable/disable options specific to the Kernel place “yes” or “no” in the variable KERNEL_SECURITY= :
# Enable/disable kernel security at boot time.
KERNEL_SECURITY="yes"
And to activate/deactivate the iptables rules, it is necessary to modify the IPTABLES_RULES= variable :
# Enable/disable iptables rules.
IPTABLES_RULES="yes"
Add, delete or modify the iptables rules
At the bottom of the configuration file: /etc/firewall.conf, you will find a function named: iptables_rules(). This function contains all of the iptables commands to launch when the firewall starts. To delete a rule, It is advisable to comment out the corresponding line with a #. It is not advisable to leave the function completely empty, if you want to disable the iptables rules just add “no” to the variable IPTABLES_RULES= in the configuration file.
Here's an example of using iptables rules. It only allows connections on the localhost and the local network, and ports 80, 22, and 21 used by the web server HTTP, the SSH secure server and FTP respectively. All other incoming and outgoing connections are refused, so it's fairly restrictive.
# Netfilter/iptables rules.
# This shell function is included in /etc/init.d/firewall.sh
# to start iptables rules.
#
iptables_rules()
{

# Drop all connections.
iptables -P INPUT DROP
iptables -P OUTPUT DROP

# Accept all on localhost (127.0.0.1).
iptables -A INPUT -i lo -j ACCEPT
iptables -A OUTPUT -o lo -j ACCEPT

# Accept all on the local network (192.168.0.0/24).
iptables -A INPUT -s 192.168.0.0/24 -j ACCEPT
iptables -A OUTPUT -d 192.168.0.0/24 -j ACCEPT

# Accept port 80 for the HTTP server.
iptables -A INPUT -i $INTERFACE -p tcp --sport 80 -j ACCEPT
iptables -A OUTPUT -o $INTERFACE -p tcp --dport 80 -j ACCEPT

# Accept port 22 for SSH.
iptables -A INPUT -i $INTERFACE -p tcp --dport 22 -j ACCEPT
iptables -A OUTPUT -o $INTERFACE -tcp --sport 22 -j ACCEPT

# Accept port 21 for active FTP connections.
iptables -A INPUT -i $INTERFACE -p tcp --dport 21 -j ACCEPT
iptables -A OUTPUT -i $INTERFACE -p tcp --sport 21 -j ACCEPT

}


